Karma and I had our morning stretches.

I get quotes from Gratefulness.org every day--and this was the (appropriate for me) quote on Wednesday:
It is a huge danger to pretend that awful things do not happen. But you need enough hope to keep going. I am trying to make hope. Flowers grow out of darkness.
Corita Kent
****
I was so restless--puttered all day long until Dagan and Leah got here after work. First I cut all the green 8 1/2 X 11" paper in half...

...scored them on my ScorPal...

...and folded them in half.

Then I got out white cardstock and started cutting...

...and saving the scraps for later papermaking, of course.

Needed the big rectangles for the embossed snowflake card fronts (sample in front-left), squares for the snowflake dies, and strips for the inside greeting (that's the template in front-top right). Done!

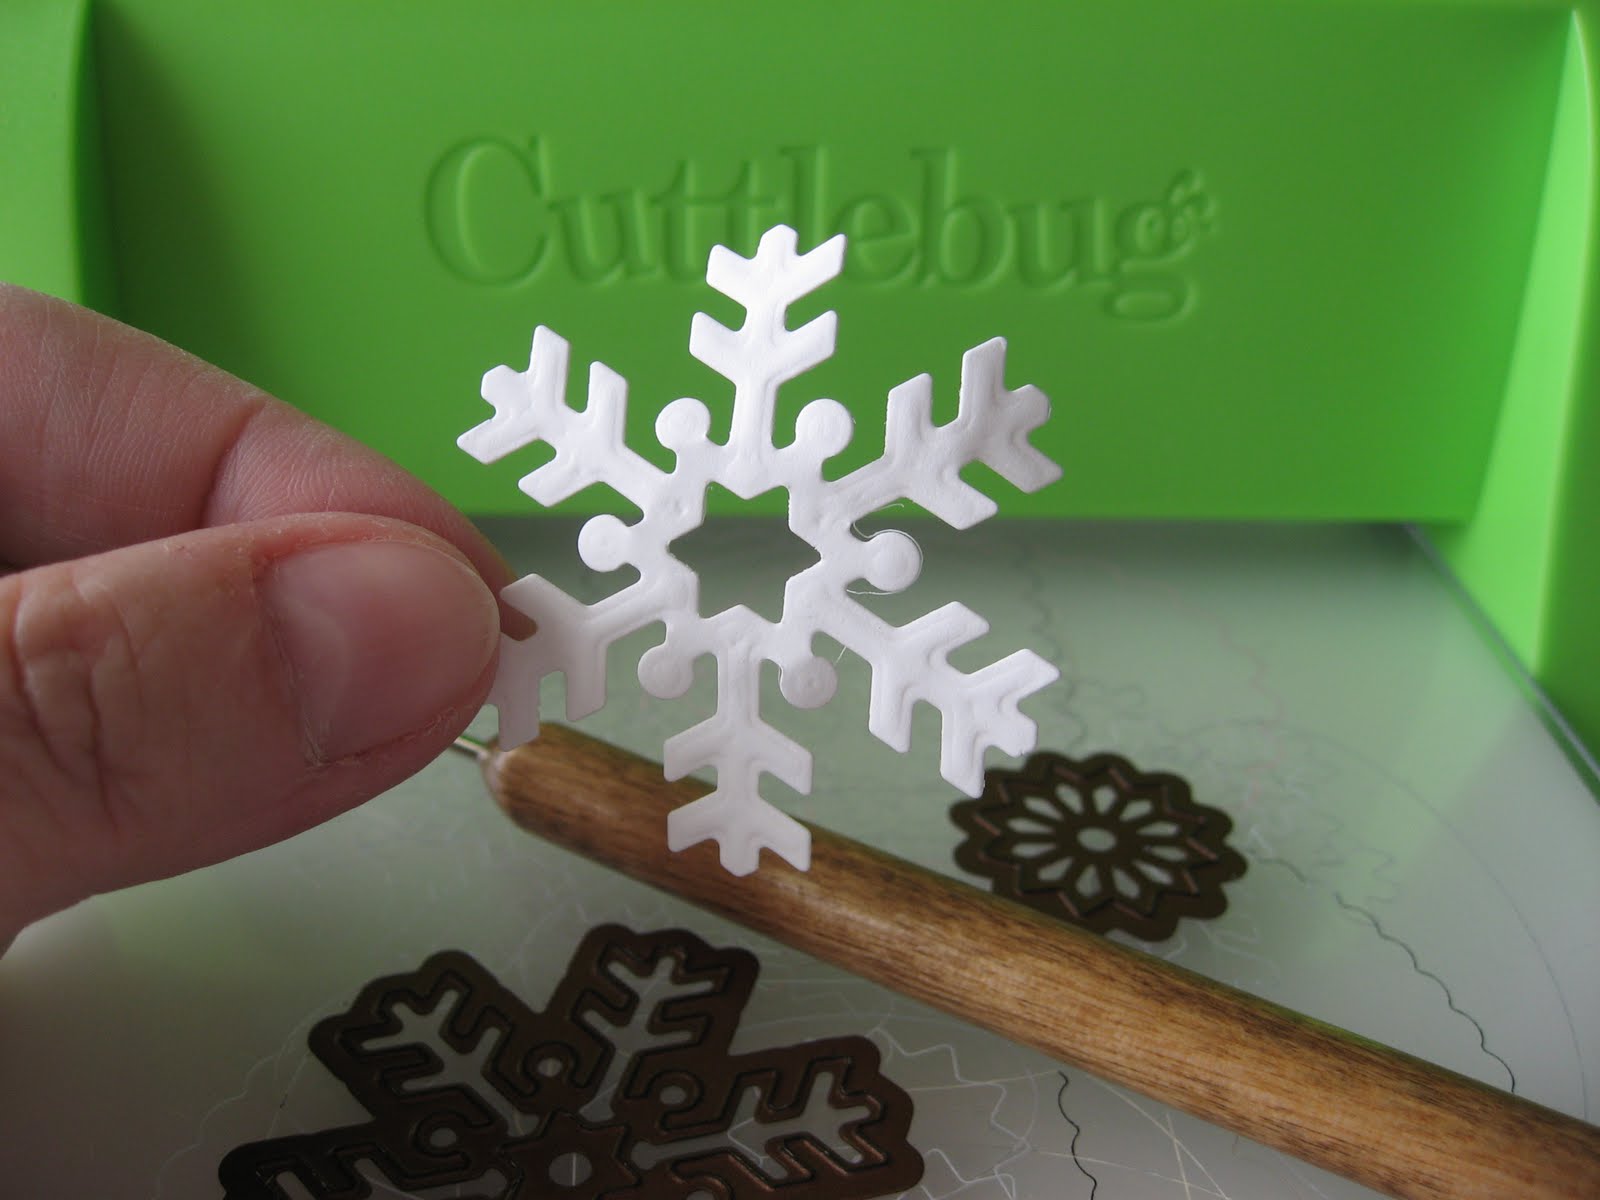
Then I started cutting and embossing the snowflakes. What follows is the entire process for every two white snowflakes I made: first lay a B plate on top of the big white A plate--lay the snowflake dies face down on the cardstock...

...then lay down a C plate and a folded piece of cardstock on top for a shim--and run it thru the "Bug".

Left the bottom A and B plates where they were--flipped the dies over like this. The dies are now cut.

Next is the embossing process. I lay a tan rubber mat down over the face-up dies...

...then a B plate and a piece of thin cardboard for a shim. (I don't have any chipboard, so I use the backing from a small legal pad.) Then run it thru the Bug.

And this is what you end up with. :)

Then you have to remove the paper from the dies (and save those scraps for papermaking, of course!).

I use a stylus to pop the centers out. The entire small snowflake comes out easily--and so does the little center star shape from the larger snowflake...

...but getting the larger, detailed snowflake out is a more careful process of poking it out with the stylus...

...just because it has so many nooks and crannies, you don't want to tear it.

Tada! So pretty!
I kept going back to do "just a few more"--hehe!

Once in a while you might have a little accident. Be careful that the dies don't slide before you crank them thru the Bug--because boo-boos take just as long to poke out of the dies--ROFL! Only had the one mistake--becoming more diligent--hehe!

When I first saw these two young men trying to break into a car in the parking lot I snapped a picture...just in case. They look like they're probably college students. We often get 2-3 college students rooming together here. These two became so totally frustrated that they left...returned two times...and never got the door open that I saw. Obviously, somebody locked their keys in the car and likely couldn't afford a locksmith to come out and open it. I can relate--ROFL!!

Anyways, I cut and embossed enough snowflakes for the additional Christmas cards--plus some extras for our supply boxes.
****
Then later in the afternoon I started on the 30 snowflake-embossed fronts I needed. This time the "sandwich" was the big white A plate, tan rubber mat...

...Fiskars embossing plate...

...the sheet of cardstock to be embossed...

...a second tan rubber mat (hang onto the cardstock as you lay this down), a piece of cardstock as a shim, and a B plate.

Run it thru the Bug and...tada!

I got all the basic parts made for the 30 additional cards...

...plus some odds and ends for the craft supplies boxes.

I had already cut up the heavy duty aluminum foil that Leah brought over last week--so I ran those thru the Bug as long as I had it out. Fun! Just the A plate with the Cuttlebug embossing folder (with the tinfoil dull side up) sandwiched between two B plates.

Voila!!

All of this took just a few minutes because I had already pre-cut the tinfoil. They do need to be trimmed to fit, but this was really fun to do...and way cheaper than buying the metal foil. Not as tough and sturdy, tho? I guess I'll find out how well it actually works when I go to put some cards together, right?

I will go back and watch the video (Stamp TV) to see how she finished these off. I think she used rub on metallics, but I am not positive. I am wondering how you can rub on these without smashing the embossing? You can also use them just like this, too, as a background on a card. Using the duller side makes them look more matt and less glaring. But I suppose sometimes you might like the shiny side for a certain effect. Interesting experiment, tho. :)
****
Dagan, Leah, and I had a delicious cheese pizza for dinner. While they were here they got a call that Dagan's Grandma Vera died (91?)--his dad's mother. They'll be gone Friday-Monday. Dagan will be a pallbearer with the other grandsons, so Dagan and Leah will be off buying him an appropriate suit tonight. Vera never liked me, but I still feel sad for her passing. She never seemed like a very happy person, you know? Such a shame to live a life and have known such limited joy. It hurts my heart. Of course, maybe I always saw her scowling because she didn't like me and she was a very different person than I knew her to be? One never knows what is in another's heart.
****
Anyways, I will go over and check on Sammy and Annie while Dagan and Leah are gone--feeding, cat box, a little conversation--and on the lookout for turkeys. :) This is the first time they have "dependents" when they leave town--ROFL!! I am thrilled to be the official cat-sitter. :):)
****
My back and shoulders and I will not be doing any crafting today--ROFL!! (Took all morning in sessions just to finish this post--it's 11:15--hehe!) But I am also feeling less antsy and restless. Slept much, much better last night, too. (Still thrilled to be on days!!) Cloudy day. Snow to the west of us. Supposed to stay very chilly for the next few days--40s and maybe low 50s. Good day for R&R. :):)
****
Please find yourself some joy today!!!!!
6 comments:
Making those snowflakes looks like a lot of work. Looks like you have it down pat, tho. They look very nice. The embossed foil looks really cool, too. I hope they don't smush when you go to work with them.
My condolences to Dagan and Leah on the passing of his grandmother. So sorry to hear the news.
Beautiful day in northeastern PA today but it's very windy. And they spread another load of crap someplace close by because it stinks to high heaven here again today. The wind is coming from the west...the direction of the fields here and on the other side of the creek.
I hope you're having a good day today.
You've certainly been busy, Rita....love the look of those snowflakes piled up like that.
So sorry to hear that Dagan's Grandmother passed away. A pity she never liked you tho.
Winter is definitely on the way in here. This morning it was only 13ºC/55ºF! LOL
The metal foil looks interesting - are those backgrounds for cards? Could you use a q-tip to apply paint?
I have used wrinkled aluminum foil in mixed media paintings with acrylics. I just glue it on with gel then put paint on it and wipe it off again so it's not so obvious.
AliceKay,
I was just so restless and antsy...kept plugging away on card stuff. Got a whole bunch done and nothing since--hehe! :):)
Dagan and Leah are gone. Grandma Vera actually had two services. One in Henning on Sat and another one down in Minneapolis on Monday. I went to see Sammy and Annie today (Sat) and will post pictures tomorrow. Was chilly, but sunny! Nice day. :):)
Serena,
I kind of overdid it, obviously, but needed to keep busy. Just stressed over the DVD, I think. figured I may as well put that energy to good use--hehe! :)
I think Vera and I were just like different species almost--hehe! She may not have liked me, but she respected me as a worker. I waitressed at her restaurant (where I met Dagan's dad--he cooked there) and she trusted to leave me in charge of the waitresses when she was gone for days. It was personal--she just didn't like me. I think I was too much the flower child for her--hehe!
55 degrees and it is winter--LOL!! You are warmer than we are in spring right now--hehe! :)
Sue,
Yes, you could use the aluminum foil as a background on a card--all the front or a part of the front--whatever. I suppose you could use acrylic paint. Anything that would stick to the foil would probably work. :) In the video she used something metallic that gave it an antiqued look.
I think I need about 100 more hours a day--ROFL!!
Post a Comment